
Vertical Landscaping: Creating a Living Wall
Imagine a rock wall overhanging a lake with water slowly cascading down the surface and mosses, ferns, ephemerals and even small trees growing from the crevices. The plants are nourished by the rainwater that provides the right amounts of nitrogen, potassium, phosphorous and trace minerals; enough sunlight maintains photosynthesis. This is the original living wall, created by Mother Nature, a lush surface that landscape architects and homeowners seek to replicate in a striking environmental trend that’s here to stay.
The vertical garden, or mur vegetal, is generally regarded as having been developed in the 1990s by French botanist Patrick Blanc, whose innovative hydroponic system was instrumental in creating lush, bountiful displays around the world. However, Stanley Hart White, a professor of landscape architecture at the University of Illinois, who patented his Botanical Bricks in 1938, may well be the first innovator of the green wall. White visualized his modular units as building blocks that could be permanently plant bearing, portable, interchangeable and curved into various shapes; they would serve to build decorative backgrounds, mask eyesores and could be permanent if constructed properly.
Whether you live in an urban area, along with 90 percent of the world’s population, or have some area into which your garden might sprawl, a vertical garden or living wall is attainable for your landscape. It takes a little research, some planning, a few tools, and a decision about how much of your financial resources you’re willing to invest.
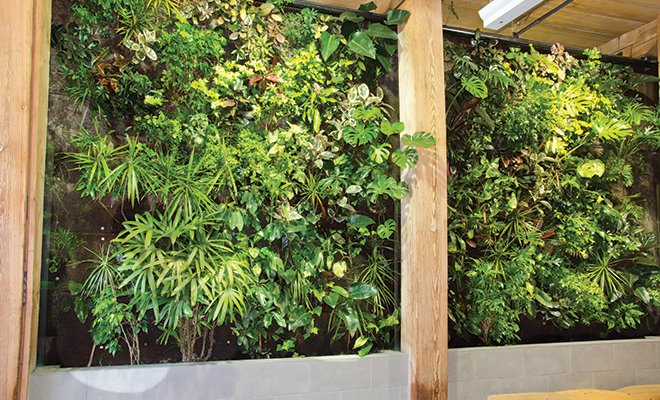
Indoors or Outdoors?
Depending on climate, an outdoor wall gives the most opportunity for biodiversity and growth. A sun-exposed wall in a warmer zone can be planted with aromatic Mediterranean plants such as lavender, thyme, rosemary or salvia; a shadowed wall, a slightly different microclimate, would support begonia, hosta, fuchsia and edible or ornamental plants.
Indoors, it’s simple enough to create a vertical display in a space-challenged area, replacing the footprint of your house plants. With an indoor temperature of around 70 degrees and lower light levels, plants adapted to this environment grow larger leaves to absorb enough light and typically flower less. Examples are philodendron, anthurium, peperomia, begonia, echeveria, miniature ferns or succulents such as hoyas.
Irrigation and Nutrition
“Vertical wall technology is pretty simple. You have to provide a means for the roots to grab and lock themselves in, free drainage to prevent sitting water, proper means for root development, and choose the correct plant for the geographic region and elevation,” writes George Irwin, president of Green Living Technologies International, LLC. A system can be freestanding or attached to a wall, and typically consists of a segmented support frame into which the plants are inserted; their roots grab the rooting surface, usually a thin coir or felt mat, and dig into the growing medium.
Irrigation is crucial for success, whether the living wall is indoors or outdoors. The indoor system may be a little trickier for the homeowner; the structure shouldn’t be directly attached to the wall, and care should be taken, just as with houseplants, for a catch tray or a recirculating system. Exterior irrigation systems can easily be hidden within the plants and ideally include a reservoir for soluble fertilizer. Be sure to properly protect surfaces from overflow or damage that might occur.
Start Small with Succulents
Before making the commitment to transform your patio or balcony space with a massive living wall, try a project for indoors that can give results in a few weeks. Succulent plants are often found growing on cliffs in the crevices of rocks or on cliff edges, clinging to what soil they can sink roots into; this makes them ideal for your miniature living wall.
Build a frame using four 12” lengths of 2” x 2” lumber; staple one-half inch hardware wire mesh to one side of the open frame and attach a square of exterior plywood or redwood to the back. If you like, add trim on the front to conceal the mesh. If you’re not handy, you can purchase a ready-made system from a retailer or online.
Choose your succulents, using your imagination and color sense. If you use larger plants or rosettes, it will take fewer plants to fill the frame. Prepare the plants by removing offsets, or stems, of plants such as echeveria, sedum and sempervivum. Cut the stems to one-quarter inch in length. Let the cuttings rest in a cool, shaded area for about a week to heal, or form a scab, before planting.
For soil, use a cactus mix or a potting mix combined with perlite or pumice to keep it light. Press the soil mix through the screen into the frame and tap to settle it; don’t pack it into the frame. Keep it lightly moist and plant your cuttings in a pleasing arrangement. Water several times over the space of the six weeks or so while the plants are rooting. When a gentle tug won’t dislodge the plants, you’re ready to hang your vertical garden! HLM
Sources: agreenroof.com, greenroofs.com, horticulturalbuildingsystems.com, plantsonwalls.com, verticalgardeningsystems.com and wikipedia.org.


