


Picture Perfect: Fun tips and tricks for arranging pictures
A stunning display of pictures is something many people envision in their homes. Making that vision a reality turns out to be a far more difficult
task, one that can easily result in a wall filled with empty, misplaced nail holes.
Indeed, there is an art and science to arranging pictures.
Use these tips to create pleasing picture arrangements, and get creative with your overall décor along the way.
Make Use of Painter’s Tape
Painter’s tape has uses beyond protecting molding, trim and ceilings when you’re wielding a paint brush. This versatile tape lets you play with picture arrangements before putting permanent holes in the wall. Mimic the sizes of your existing frames or simply trace the size of your pictures on paper and use the painter’s tape to tack them to the wall until you settle on an arrangement. Feeling especially whimsical? Use painter’s tape to create the actual frames for holding your photos, postcards and pictures.
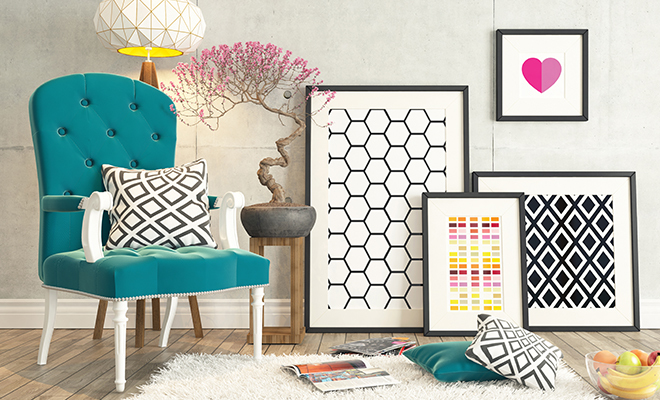
Get Off the Wall
Walls aren’t the only places for pictures. Propping artwork against a piece of furniture creates an interesting place for the eye to go. Have a series of bookshelves with nothing topping them? Prop up your favorite art prints or photographs and intermix other accessories to create a storytelling display. And don’t neglect the unexpected places for pictures; hang artwork
in front of a bookcase, on the face of a shelf, or prop smaller pieces on the back of a shelf.
Put Like with Like
A powerful display of art can come from unifying features: all close-up nature photographs in the same size using the same matting in the same frames will certainly be impressive. But
even one constant element will help unify a look, such as all black frames, even if the subject matter is varied or the pictures are haphazardly gathered on one wall or scattered throughout a room.
Get the Gallery Look
If you’re not into symmetry and similarity, you can achieve the art gallery look by arranging unlike art in asymmetrical patterns. The trick is to keep the images hung very closely together, or even dare to overlap them for a more casual feel. Include more than just framed art as well, such as plates, shells, or even miniature shelves holding small sculptures. Position the most prominent piece at eye level and work your way out.
Tipping the Scale
One of the biggest mistakes people make when hanging art or photographs is putting the wrong size image in the wrong place. A too-small piece above an extra-large sofa will create a funhouse look (and not in a good way). But one extra-large piece can be a stunning statement in an entryway. Picture-hanging is about making andbreaking rules; you just have to test both methods until you find the one that suits your décor and style.
Give Corners Some Love
It’s easy to overlook the corners of your rooms, or simply stuff them with plants or a chair that has no other place. Fill up “empty” corner space with a pleasing gallery display of mini photos (think your fave Instagram prints in 3” x 3”). Or even enhance edges with cool corner frames.
From the Floor Up
Don’t be afraid to test out different designs for your artwork or photographs on the floor before you hang them up. Mix and match your arrangements, and take pictures of each one with your smartphone. This can help you feel freer about the display you’re creating and not be fearful of testing out an unusual print or unexpected object that you might otherwise have nixed if you only allowed yourself to work on the wall itself. HLM


